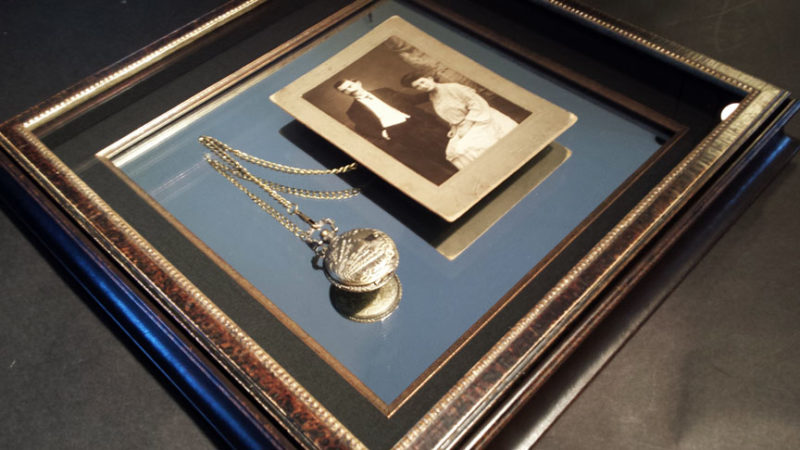
 This could be my favorite shadowbox of all time and that’s saying something since I’ve been putting my passion for framing into building extraordinary frames for twenty-five years. This project is special to me because of the technique I used to mount the watch. The antique items presented a challenge and I knew I wanted an innovative and elegant solution. I’m so pleased with the finished frame. The resulting effect offers the viewer a modern approach to framing antique items. It looks so simple, but I love it most because it solved a big design dilemma. How can I show the back of the pocket watch?
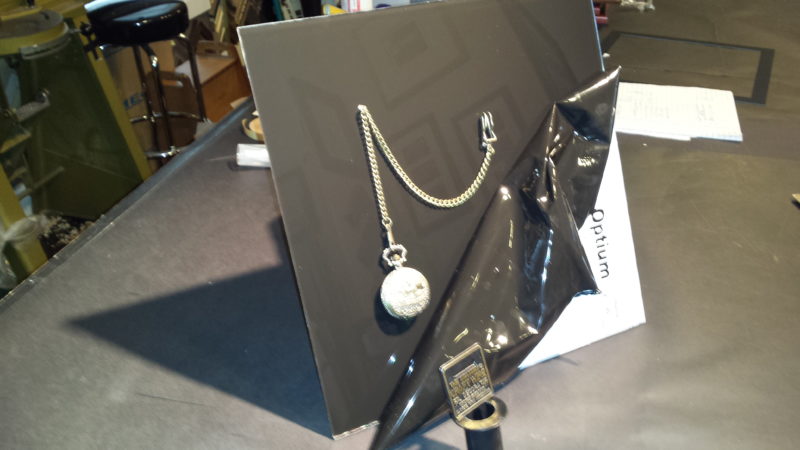
The answer was to add a mirror behind the watch. That part seemed obvious. The mirror would reflect the engraving on the back of the watch, but only if the watch was away from the surface. That’s where it got tricky. I needed to use some hocus-pocus framer’s magic to suspend the watch and photo away from the mirror. What I used was close… Tru Vue’s Optium Museum Acrylic.
If you imagine the frame layers as a sandwich, the mirror and outer glazing are the bread slices. The items and acrylic they’re attached to are the delicious center. The inner acrylic provided a solid foundation for attaching the watch while appearing invisible to the viewer. The only challenge was drilling small holes through acrylic. I marked the points on the acrylic, and used a 1/8” drill bit to go through the acrylic leaving the cover paper in place. I worked slowly, moving though the acrylic with the drill stopping as the tip of the drill touched the wood table surface below. Surprisingly, the drilling went smoother than I anticipated.

The watch is wired down in three points. I threaded the gold wire through the two small holes at each of the three spots to secure the watch chain in place… Leaving the protective paper on was the key. This saved the surface while I worked on mounting the items. Removing the covering was the last step. I waited until all the other framing components were complete and the frame was ready to fit.
Now for the photo, it is floated on black foam core that has been attached to the acrylic using the same drilling process. Instead of using wire, I used monofilament thread in an X pattern (like sewing on a button) to secure the first piece of black foam in place. The next piece of black foam core is attached to the back of the photo with mulberry hinging paper and wheat starch paste. The final step was to glue the 2 pieces of foam together. By doing it this way, it allowed me to position the photo exactly where I wanted it.
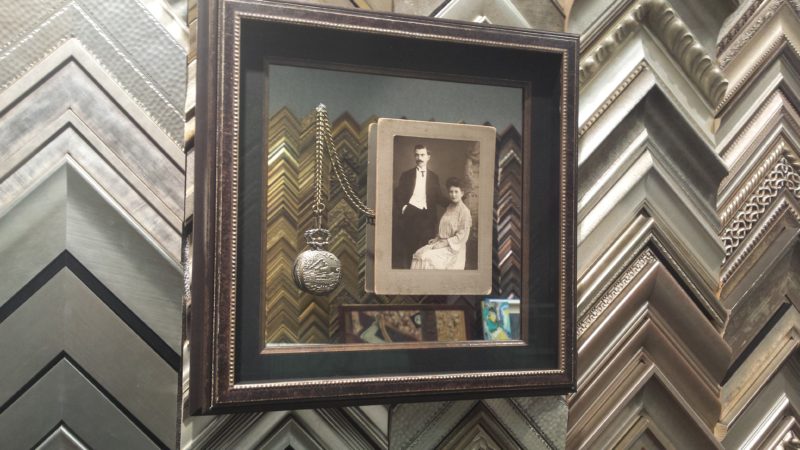
Now for the other nuts and bolts, can I talk about how much I love this frame combination? The stacked frames are from Larson Juhl’s Whitman collection. I love the finish and the flexibility for stacking with the different profiles. I often use narrow frames on top of a wider moulding turned on its side. I do this so often in fact that Larson Juhl knows the routine and happily chops these complicated cuts for me. These difficult stacks allows me to offer countless shadowbox combinations without being confined to the typical manufactured deep frames. Besides, I love doing the unexpected. Inside the frame, I used a black linen mat trimmed with a fillet that would go on top of the mirror. Here came problem number two. How do I hide the back of the fillet so it isn’t reflected?
If you’ve ever noticed the unfinished edge of a frame that is reflected in the mirror, you know the struggle is real. That little detail can spoil an otherwise good design. The answer to disguising the underside of the fillet was to add a solid core black mat. I realized this of course after trying black tape, followed by painting the fillet, both failed the design test. The hidden mat was cut just shy of the edge of the fillet and looked clean and perfect.
The project was ready to fit. The mirror was in place. The black linen mat and fillet, with solid-core black mat hidden underneath, was placed on the mirror. The drilled piece of OMA with watch and photo rested on the mat. That space was enough to reflect the back of the watch. Then I placed a half-inch black linen mat spacers along the sides of the frame. This supports the outer piece of acrylic and keeps the acrylic from touching the watch.
When it came time to assemble all of the components, I took a deep cleansing breath and prepared to tackle fitting this triple reflective threat. I don’t have to tell you that this is a framer’s nightmare! Here’s how it went. I cleaned the mirror; added the mat; remove the cover on the OMA and put in place. Wait! There’s dust. I pulled back the OMA and blew off the dust from the mirror for the umpteenth time; then repeated this process several times. The same went for the final piece of OMA that sat on top of the black spacer. In the end, after the finally dust cover and wire were attached, the results were well worth the effort.
This 12” x 12” shadowbox gives viewers a visual treat for the eye. The color scheme is deliberately simple only showcasing black and brown with a touch of aged metallic bronze. The stacked frames add interest to the design without overwhelming the small scale of the items. The black linen provides a visual anchor and a place for your eye to rest between the items and the frame. But my favorite part by far is the mirror. The reflective surface captures the viewer’s eye and draws you in for a closer look; exactly what good design should do.
Shadowbox displays like this, can show off family treasures with an elegant and modern style… and a bit of a mystery as to how the items appear to be floating in space. Imagine how a frame like this hanging in your store would spark customer’s imagination. I hope you build your own. Use a photo from an antique store and inexpensive pocket watch and show off your shadowboxing skills. When customers ask how the items are in there, just tell them it’s a little bit of framing magic.
* This article appeared in Picture Framing Magazine in July 2018.
Leave A Comment
You must be logged in to post a comment.